A quick-start guide to get you up and running with Alchemer Mobile. Read on for step-by-step instructions to integration success.
Define Your Events and Custom Data
Alchemer Mobile uses Events to determine when to display any Interaction, like the Love Dialog, Surveys, or Rating Dialog. Events are typically actions like “Performed Search,” “Purchased,” or “Viewed Profile.” When you’re building your interactions, you can decide which specific Events you’ll use, so it’s best to add 20 to 50 Events to start with.
Alchemer Mobile uses Custom Data to further determine when interactions are shown. Be sure to add a 'Customer ID', which can be any identifier that's unique to a specific customer.
**Check the 'Identify Your Customer With Customer ID' section below for more information on how to setup Customer ID**
In addition to customer ID, we see best results when you add 5 to 10 other Custom Data fields. Other examples could be “Plan Name,” “Purchase Total," "Subscription Type," etc. An example usage might be “Only show this Survey to our Gold Members.”
Compile a list of all the Events and Custom Data you think you’ll need (more is better). Later, you’ll send the list off to your development team, along with the link to the integration documentation, to have them begin integrating the Alchemer Mobile SDK.
Identify Your Customer With Customer ID
Depending on the product, your customer can log in and out at will, browse anonymously, or use different devices. Customer ID is a unique value that identifies your customer across sessions and devices. In Alchemer Mobile, we strongly suggest that Customer IDs are set for each of your users. Providing this identifier will allow you to:
- Track your users across devices and platforms.
- Tie customer information with their Fan Signal and get more insight into the people you are talking to.
- Target a specific customer regardless of the device/platform.
How can I pass Customer ID to Alchemer Mobile?
You must pass your customer identification value through as Person Custom Data. Please refer to our main integration references for details on iOS and Android.
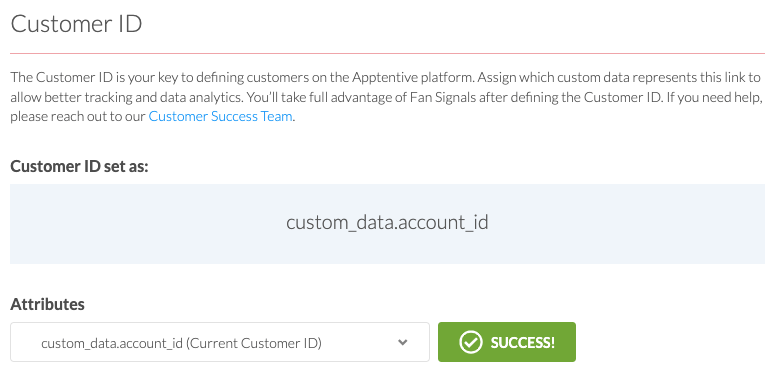
Set up a Customer ID
To set the attribute as a Customer ID for your application, you need to be logged into your Alchemer Mobile profile. Open the Settings page and find the ‘Customer ID’ section.
I don’t have a Customer ID
A Customer ID should be set for each of your customers. But in case you don’t have or are not passing a customer identification value, we suggest you reach out to internal teams and work with them to set up Customer ID for each of your customers.
I don’t see my Customer ID
In case you don’t see your identifying attribute in person custom data, please reach out to your Customer Success Manager or contact support directly.
Interactions to Engage Your Customers
Love Dialog
Gauge customer sentiment using a simple question: "Do you love us?". Gather feedback from the "silent majority" of your customers and use real customer responses as a jump-off point for further engagement and feedback.
Turn customers that love your app into evangelists. And for those that aren’t satisfied, start a conversation and learn how to convert your biggest critics into loyal fans.
Message Center
With Message Center, you can have direct, two-way in-app conversations with your customers. They can ask questions and get timely responses from your team. Let your customers be heard!
Make sure there’s an easily accessible button in your app to launch Message Center. The common place for a “Send Feedback” button is in your main app menu.
You can customize the content that shows up to your customers in Message Center and have your developers customize the look and feel of Message Center when they integrate the Alchemer Mobile SDK.
Rating Dialog
Proactively encourage the "silent majority" of customers to leave ratings and reviews. Boost your ratings by guiding those who love your app to rate it in an app store, while engaging unsatisfied customers in a conversation or Survey to learn what you can do better.
Prompts
Prompts (formerly Notes) are one-time, in-app messages that enable you to engage a broad group of your customers. Prompts allow you to link to different interactions, specific locations within your app via a deep link, or even to a web page by adding different button options.
Important: Your developers will need to allow for deep linking prior to releasing. When they are integrating the SDK, be sure to have them set up the ability to deep link, as well.
Surveys
Alchemer Mobile Surveys provide you with the tools to target your customers in-app, at the optimal time and place, to get the feedback you’re looking for. Surveys can be customized by your developers to have exactly the look and feel of your app. Our Surveys are fully customizable, and can be targeted to as broad or narrow of an audience as you like.
Integrating the Alchemer Mobile SDK
Your development team should be able to integrate the Alchemer Mobile SDK in about an hour. Send them the list of Events and Custom Data you compiled earlier and the link to the Alchemer Mobile SDK developer documentation, and they should be able to get started right away.
After your development team has integrated the SDK, you can check to make sure the Events you defined work correctly. Click around in your app and at each place you expect an Event to be triggered. You can expect the Events page of your Dashboard to populate those events within 2 hours. For more details on testing, skip down to the testing section below.
Targeted segments are created on the Targeting page within each interaction. There, you’ll see three areas you’ll need to set up: Who, Where, and When/How Often.
Who
Use the Targeting Segment Builder to define which of your customers will see an interaction. You can create segments based on your customers’ device specifications, personal attributes (Custom Data), and any actions they’ve taken within the app (Events). For example, you could create a segment where you want to re-engage people who have made several purchases in the past but have not bought anything within the last month.
Where
“Where” targeting allows you to decide on which screen the interaction will actually appear within your app. After a user satisfies the criteria in the “Who” segment, the interaction will appear immediately as soon as the Event set in the Where section is triggered.
When/How Often
“When” targeting allows you to specify a start date, end date, and even specific times when you interaction will appear. If you don’t specify any dates then your interaction will run until you explicitly pause it. Depending on the interaction type, there are other “When” options, such as how many times to display a specific interaction, how long to wait after a version update, etc.
Testing
It can take up to 2 hours for Events to populate on your Dashboard after they've been engaged. If you'd like to test an event but it has not yet been seen on your Events page, use the blue "Add a New Event" button on the right side of your Events page and type in the exact name of the event you want to test. This will add that event to our system without requiring you to wait for the SDK to add it automatically.
Next, set up a basic interaction. Start with a Survey. To create a new Survey, go to the "Interactions" page of your Dashboard, then select "Surveys", and click "New Survey". Add a test question or two to the sample Survey to get a sense of the look and feel, then click save. On the Targeting page within your Survey, click “Publish Survey as an independent Interaction.” For basic testing, you don’t need to add any Who segments. Add a “Where” event you can easily trigger. For the "When" section, simply check the box next to "Allow multiple responses from the same person". This will make the Survey appear anytime you engage the "Where" event in subsequent tests. Save those changes. Finally, on the next page, click "Launch".
On your app or emulator, uninstall the app then reinstall it to ensure your new Survey retrieved from the Alchemer servers. Open the app and trigger the "Where" event that you set on your Dashboard. You should see your Survey appear. Feel free to leave a response. Back in your Alchemer Mobile Dashboard, go to the Survey reporting tab and refresh your browser to see your answer.
Final Steps Before Releasing to the App Stores
Transition to a Production App
If you have been using a test or development app in Alchemer Mobile, you will need to recreate your Events and Interactions in the Dashboard for your production app. Surveys and Prompts can be copied between apps using the “Clone” buttons within the interaction.
Most importantly, your developers will need to change the app key and app signature to your production Alchemer Mobile key and signature BEFORE releasing to an app store.
Questions?
We’re excited for you to start engaging with your customers using Alchemer Mobile. If you have any questions or concerns at all, please contact us.
Integration Checklist
- Create both production and test apps in the Alchemer Mobile web interface. You can create a new Alchemer Mobile dashboard by selecting the top left App Icon.
- Invite developers and other team members to be administrators or collaborators within Alchemer Mobile. You can invite new Team Members in the Settings section of the dashboard.
- Determine 20-50 Events needed and decide on 5-10 Custom Data fields in addition to customer ID you would like to track. Fill out the provided template accordingly. With a Customer ID you will be able to take advantage of advanced targeting and download capabilities including Fan Signals.
- Create work items for development team:
- Add SDK to apps and set correct app key and app signature for different environments (e.g. test, production).
- Pass through your Customer ID as Custom Data.
- Implement Event and Custom Data as defined in template.
- Add a Message Center button within the app (skip if not using Message Center). This is important for having a place for customers to retrieve message responses.
- Set up deep links for use with Prompts.
- Make any necessary style changes to the Survey and Message Center (refer to these guides: iOS | Android). - Ensure event counts within the dashboard are increasing as they are engaged.
- Create a simple Survey in your test Alchemer Mobile Dashboard, we recommend using limited targeting to ensure this can be easily triggered in your test instance. Launch that Survey in your test app to ensure it is set up and triggering correctly.
- Test your Love and Rating Prompt. Google and Apple have restrictions around surfacing the Rating Dialog while testing which are explained further for iOS and Android.
- IMPORTANT: Change the app key and app signature to your production credentials.
- Release app to the stores.
- Review results!
