A complete guide to integrating Alchemer Mobile (Formerly Apptentive) Android 6.0+ SDKs into your Apps.
System Requirements
minSDK version: 21 (Android 5.0)
compileSDK version: 31 to 33
Gradle version: >= 7.0.0
classpath 'com.android.tools.build:gradle:7.0.0'
Dependencies
Starting from 6.0 Alchemer Mobile SDKs are written in Kotlin and have multiple modules. Every module has an InteractionLauncher to launch a specific interaction along with its view components. The main module apptentive-kit-androidwraps all these modules and delivers them as a single component.
Dependency Modules in apptentive-kit-android
- Core
- Core UI
- Feedback
- Enjoyment Dialog
- Prompts (formerly Notes)
- Navigate to Link
- In App Review
- Ratings
- Survey
- Message Center
Other dependencies
These are direct dependencies on the individual modules and transitive for apptentive-kit-android
- AndroidX AppCompat
- AndroidX Activity
- AndroidX Constraintlayout
- AndroidX Fragment
- AndroidX Lifecycle
- AndroidX ExitInterface
- AndroidX Core KTX
- Google Gson
- Google Play
- Google GMS Play
- Google Material Design
Supported Languages
We have translated all hard-coded strings in our SDK into the following languages. The content of all Interactions comes from our server, and you may translate the text for each Interaction by visiting the Translations Page.
| Locale Qualifier | Language Name |
|---|---|
| Default Language | English |
ar | Arabic |
da | Danish |
de | German |
el | Greek, Modern |
es | Spanish; Castilian |
fr | French |
fr-CA | French Canadian |
id | Indonesian |
it | Italian |
ja | Japanese |
ko | Korean |
ms | Malay |
nl | Dutch |
pl | Polish |
pt | Portuguese |
ru | Russian |
sv | Swedish |
th | Thai |
tr | Turkish |
zh | Chinese |
zh-TW | Chinese (Traditional, Taiwan) |
Adding Alchemer Mobile
Alchemer Mobile is open source, available at Alchemer Mobile (Apptentive) Android SDK repo
To ensure the SDK functions properly, when upgrading please make sure to read the Migration Guide for each version above the version you are currently using.
Add Dependency
To install the SDK, add apptentive-kit-android to the dependencies block of your app/build.gradle file, replace APPTENTIVE_VERSION with the most recent one.
repositories {
  mavenCentral()
}

dependencies {
     implementation 'com.apptentive:apptentive-kit-android:APPTENTIVE_VERSION'
}
For details on the latest SDK releases and past versions, see the Releases page on GitHub.
Register Alchemer Mobile
Configure the SDK using ApptentiveConfiguration with your Alchemer Mobile (Apptentive) App Key and Alchemer Mobile (Apptentive) App Signature in your Application subclass. These values are available from the API & Development section of the Settings tab in your Alchemer Mobile Dashboard. For more information on the optional ApptentiveConfiguration parameters, see the Alchemer Mobile Configuration optional parameters section.
Kotlin:
class MyApplication : Application() {
    override fun onCreate() {
        super.onCreate()
        val configuration = ApptentiveConfiguration(
        apptentiveKey = "<YOUR_APPTENTIVE_KEY>",
        apptentiveSignature = "<YOUR_APPTENTIVE_SIGNATURE>"
        ).apply {
            /**
            * Optional parameters:
            * shouldInheritAppTheme - Default is true
            * logLevel - Default is LogLevel.Info
            * shouldSanitizeLogMessages - Default is true
            * ratingInteractionThrottleLength - Default is TimeUnit.DAYS.toMillis(7)
            * customAppStoreURL - Default is null (Rating Interaction attempts to show Google In-App Review)
            */
        }
        Apptentive.register(this, configuration)
    }
}
Java:
public class MyApplication extends Application {
    @Override
    public void onCreate() {
        super.onCreate();
        /*
        * Optional parameters:
        * shouldInheritAppTheme - Default is true
        * logLevel - Default is LogLevel.Info
        * shouldSanitizeLogMessages - Default is true
        * ratingInteractionThrottleLength - Default is TimeUnit.DAYS.toMillis(7)
        * customAppStoreURL - Default is null (Rating Interaction attempts to show Google In-App Review)
        */
        ApptentiveConfiguration configuration = new ApptentiveConfiguration(
            "<YOUR_APPTENTIVE_KEY>",
            "<YOUR_APPTENTIVE_SIGNATURE>"
        );

        Apptentive.register(this, configuration);
    }
}
Integrating Without an Application Class
If you don’t already have an Application class defined in your app, you will need to create one and add it in your Manifest. Simply create a subclass of android.app.Application, make sure it calls Apptentive.register() , like above, and add it to your AndroidManifest.xml in the <application> element with android:name="YourApplication" like this:
<application android:name=".YourApplication"
             android:label="Your App Name"
             android:icon="@drawable/icon"
             android:theme="@style/YourTheme">
Using Registration Callbacks
Our registration callbacks help you debug the Alchemer Mobile SDK.
Kotlin:
Apptentive.register(this, configuration) {
    when (it) {
        is RegisterResult.Success -> Log.i(
            "Apptentive Registration",
            "Registration successful"
        )
        is RegisterResult.Failure -> Log.w(
            "Apptentive Registration",
            "Registration failed with response code: ${it.responseCode} and error message: ${it.message}"
        )
        is RegisterResult.Exception -> Log.e(
            "Apptentive Registration",
            "Registration failed with exception",
            it.error
        )
    }
}
Java:
Apptentive.register(this, configuration, result -> {
    if (result instanceof RegisterResult.Success) {
        Log.i("Apptentive Registration", "Registration successful");
    } else if (result instanceof RegisterResult.Failure) {
        RegisterResult.Failure resultFailure = (RegisterResult.Failure) result;
        Log.w(
            "Apptentive Registration",
            "Registration failed with response code: " + resultFailure.getResponseCode() +
            ", and error message: " + resultFailure.getMessage()
        );
    } else if (result instanceof RegisterResult.Exception) {
        RegisterResult.Exception resultError = (RegisterResult.Exception) result;
        Log.e("Apptentive Registration", "Registration failed with an exception", resultError.getError());
    }
});
Registering/Unregistering the Activity Callback to the SDK
With the re-write of the SDK, we leveraged a modern architecture using modules. This allows for greater flexibility in where the engage method can be called from.
The Alchemer Mobile SDK now needs to register the Activity to the SDK in order to show our Interactions in your application.
This will need to be done for every Activity within your application.
We recommend that you implement this within a BaseActivity that your other Activities can extend from or use Android Jetpack Navigation. This will enable you to implement this a minimum number of times.
This is a 4 step process:
- Extend the
ApptentiveActivityInfointerface to yourActivity - Override the
getApptentiveActivityInfofunction- You will just return
this(theActivity)
- You will just return
- Register the callback with the Apptentive SDK using the
registerApptentiveActivityInfoCallbackfunction within youronResumefunction (after thesuper) - (Optional) Unregister the callback using
unregisterApptentiveActivityInfoCallbackfunction within youronPausefunction (before thesuper)
Unregistering the callback is required in version 6.0.0
Kotlin:
class MainActivity : AppCompatActivity(), ApptentiveActivityInfo {
    override fun onResume() {
        super.onResume()
        Apptentive.registerApptentiveActivityInfoCallback(this)
    }

    override fun getApptentiveActivityInfo(): Activity {
        return this
    }

    override fun onPause() {
        //Optional from 6.0.1
        Apptentive.unregisterApptentiveActivityInfoCallback(this)
        super.onPause()
    }
}
Java:
public class MainActivity extends AppCompatActivity implements ApptentiveActivityInfo {
    @Override
    protected void onResume() {
        super.onResume();
        Apptentive.registerApptentiveActivityInfoCallback(this);
    }

    @NonNull
    @Override
    public Activity getApptentiveActivityInfo() {
        return this;
    }

    @Override
    protected void onPause() {
        //Optional from 6.0.1
        Apptentive.unregisterApptentiveActivityInfoCallback(this);
        super.onPause();
    }
}
Alchemer Mobile Configuration Optional Parameters
The configuration options are enabled with defaults that are production-ready. Check out here for more details.
Migrating from Legacy SDK 5.x to 6.x
Use this migration guide if you are still using Legacy SDKs to make use of Response targeting and extended dev-supported interface customization. Going forward only 6.x+ will get all the new features.
Device Storage Encryption
If your application maintains sensitive user data (account numbers, health information, etc) and you pass it to Alchemer Mobile SDK (as a custom person/device data) – you may want to enable encrypted device storage.
This can be done when setting the ApptentiveConfiguration.
Kotlin:
val configuration = ApptentiveConfiguration(...)
configuration.shouldEncryptStorage = true
Apptentive.register(this, configuration)
Java:
ApptentiveConfiguration configuration = new ApptentiveConfiguration(...)
configuration.setShouldEncryptStorage(true);
Apptentive.register(this, configuration);
Your app doesn’t need this option if it won’t pass any sensitive information to Alchemer Mobile. Alchemer Mobile SDK itself does not store any sensitive information (anything an attacker can use to compromise user accounts) unless it is passed to it through custom person/device data.
Styling Alchemer Mobile
Alchemer Mobile will inherit your app’s styles by default. Check out here to learn what we have added in 6.x and what has changed since 5.x.
Rich content
Starting from the version 6.6, Prompts (formerly called Notes) can be styled through dashboard. Check out here to learn more.
Note: If a Prompt is customized to include an image via both interface customization and the dashboard, the image added through the dashboard overrides the interface customization setting.
Local interface customization
If you want to customize more, check this article on our interface customization currently available and how the default interaction UIs look.
Logging
To set the severity of log messages shown in the logs, set the Alchemer Mobile LogLevel. The default is set to LogLevel.Info.
Kotlin:
val configuration = ApptentiveConfiguration(...)
configuration.logLevel = LogLevel.DEBUG
Apptentive.register(this, configuration)
Java:
ApptentiveConfiguration configuration = new ApptentiveConfiguration(...)
configuration.setLogLevel(LogLevel.Debug);
Apptentive.register(this, configuration);
Engage Events
You will use these Events later to target Interactions, and to determine whether an Interaction can be shown. You trigger an Event with the engage() method. This will record the Event, and then check to see if any Interactions targeted to that Event are allowed to be displayed, based on the logic you set up in the Alchemer Mobile Dashboard.
From 6.0, engage() can be passed with an optional callback method EngagementCallback that accepts EngagementResult as a parameter. EngagementResult helps you understand if the engage call has triggered an interaction or not.
Events can be added almost* anywhere in the App. A few good places would be when an Activity comes to focus, on a button tap or when the App encounters an error.
Avoid calling engage events in your Application class or before the SDK has a chance to get fully registered.
Kotlin:
override fun onResume() {
   super.onResume()
   /* Engage event when an Activity is foreground */
   Apptentive.engage("my_activity_focused") { result ->
      when (result) {
         is EngagementResult.InteractionShown -> { /* Interaction was shown */ }
         is EngagementResult.InteractionNotShown -> { /* Interaction was NOT shown */ }
         is EngagementResult.Error -> { /* There was an error during evaluation */ }
         is EngagementResult.Exception -> { /* Something went wrong */ }
      }
   }
}

private fun setListeners() {
    sendButton.setOnClickListener {
       /* Engage event when a button is tapped */
       Apptentive.engage("send_button_clicked") { result ->
          if (result is EngagementResult.InteractionShown) {
             /* Interaction is shown */
          }
       }
    }
}

private fun processInput() {
   try {
      processUserInput();
   } catch (e Exception) {
     /* Engage event when the app encounters an error */
     Apptentive.engage("exception_processing_user_input")
   }
}
Java:
@Override
protected void onResume() {
   super.onResume();
   /* Engage event when an Activity is foreground */
   Apptentive.engage("my_activity_focused", null, new EngagementCallback()  {
       @Override
       public void onComplete(EngagementResult result) {
           if (result instanceof EngagementResult.InteractionShown) {
               /* Interaction was shown */
            } else if (result instanceof EngagementResult.InteractionNotShown) {
                /* Interaction was NOT shown */
            } else if (result instanceof EngagementResult.Error) {
                /* There was an error during evaluation */
            } else if (result instanceof EngagementResult.Exception) {
                /* Something went wrong */
            }
        }
   });
}

private void setListeners() {
   /* Engage event when a button is tapped */
   sendButton.setOnClickListener(new View.OnClickListener() {
      public void onClick(View view) {
         Apptentive.engage("send_button_clicked");
      }
    });
}

private void processData() {
   try {
     processUserInput();
   } catch (Exception e) {
     Log.e(TAG, e);
     /* Engage event when the app encounters an error */
     Apptentive.engage("exception_processing_user_input");
   }
}
You can add an Event almost anywhere in your app, just remember that if you want to show an Interaction at that Event, it needs to be a place where launching an Activity (Survey and Message Center) or a Dialog (Love Dialog & Prompts) will not cause a problem in your app.
We recommend that you create at least 20 – 50 Events. This gives you the flexibility to choose the best place for Interactions to display after your app is live, without having to update your app.
Note: Make sure you don’t start another Activity right after calling Apptentive.engage(). If you do, and the engage() call launches an Interaction, then the Activity you launch will cover it up. Instead, call engage() in the onResume() of that new Activity, or check the return value of engage(). If it returns EngagementResult.InteractionShown, it is about to launch an Activity or a Dialog.
Event Names
Our web dashboard works best for up to several dozen unique event names. It does not work well if you auto-generate thousands of unique event names. If you plan to target users based on viewing a piece of content out of a collection of hundreds or thousands (say, SKUs in an online retail app), do not create event names for each piece of content. Instead, you can use Custom Person Data for items viewed.
For example, you could set a key viewed_item with a value 123456. You could then target users for whom that key matches.
Event Monitoring
Event monitoring will allow you to listen to and act on specific events from the Alchemer Mobile SDK.
The SDK will post a EventNotification data class to the eventNotificationObservable Observable from the Apptentive.kt class when an event is engaged.
The EventInteraction data class returns a name, vendor, interaction, and interactionId
namethe name of the event that was passed into theengagemethod.vendorthe organization that created the event. Internal Alchemer Mobile SDK-engaged events will have “com.apptentive” and app-engaged events will have “local”.interactionthe name of the interaction that the event was engaged from (see table below). “app” if not engaged from an interaction.interactionIdthe id of the interaction that the event was engaged from.nullif not engaged from an interaction.
Kotlin:
Apptentive.eventNotificationObservable.observe { notification ->
    val name = notification?.name
    val vendor = notification?.vendor
    val interaction = notification?.interaction
    val interactionId = notification?.interactionId?.let { id -> "\"$id\"" } ?: "`null`"

    val notificationText = "Name: \"$name\". Vendor: \"$vendor\". " +
                    "Interaction: \"$interaction\". Interaction ID: $interactionId"
    Log.d("APPTENTIVE_EVENT", notificationText)

    // Survey interaction handling
    if (interaction == "Survey") {
        when (name) {
            "launch" -> { /* Survey shown */ }
            "submit" -> { /* Survey completed */ }
            "cancel", "cancel_partial" -> { /* Survey closed without completing */ }
        }
    }
}
Java:
@Override
protected void onCreate(@Nullable Bundle savedInstanceState) {
    super.onCreate(savedInstanceState);
    ...

    Apptentive.getEventNotificationObservable().observe(this::handleEventNotification);
}

public Unit handleEventNotification(EventNotification notification) {
    String name = notification.getName();
    String vendor = notification.getVendor();
    String interaction = notification.getInteraction();
    String interactionId = notification.getInteractionId() != null ?
            "\"" + notification.getInteractionId() + "\"" : "`null`";

    String notificationText = "Name: \"" + name + "\". Vendor: \"" + vendor + "\". " +
            "Interaction: \"" + interaction + "\". Interaction ID: " + interactionId;
    Log.d("APPTENTIVE_EVENT", notificationText);

    // Survey interaction handling
    if (interaction.equals("Survey")) {
        switch (name) {
            case "launch":
                // Survey shown
                break;
            case "submit":
                // Survey completed
                break;
            case "cancel":
            case "cancel_partial":
                // Survey closed without completing
                break;
        }
    }

    return Unit.INSTANCE;
}
Use Apptentive.eventNotficationObservable.removeObserver(observer: (T) -> Unit) in the cleanup methods of your Activity and View models to avoid memory leak.
Alchemer Mobile Interaction –> EventNotificationinteraction
| Interaction Type | EventNotification interaction |
| Love Dialog | “EnjoymentDialog” |
| Prompt (formerly Note) Dialog | “TextModal” |
| Link Navigation (This is used when a Prompt (formerly Note) action links to an external site or an app DeepLink) | “NavigateToLink” |
| Survey | “Survey” |
| Message Center | “MessageCenter” |
| Google Play In-App Review (The default rating prompt) | “InAppRatingDialog” |
| Apptentive Rating Dialog (Shows instead of the Google Play In-App Review if the customAppStoreURL is set) | “RatingDialog” |
| App Store Rating (Used when the customer selects the “Rate” action in the Apptentive Rating Dialog and then sends the customer to the URL set to customAppStoreURL) | “AppStoreRating” |
Internal events
An incomplete list of internal events that the Alchemer Mobile SDK engages.
Contact your CSM if there’s an internal event you’d like to see added.
| Description | Name | Interaction |
|---|---|---|
| App launched or a login happened | “launch” | “app” |
| App closed | “exit” | “app” |
| Interaction shown | “launch” | Any interaction (See above table) |
| Love Dialog yes action | “yes” | “EnjoymentDialog” |
| Love Dialog no action | “no” | “EnjoymentDialog” |
| Prompt (formerly Note) Dialog non-dismiss action | “interaction” | “TextModal” |
| Prompt (formerly Note) Dialog dismiss action | “dismiss” | “TextModal” |
| Prompt (formerly Note) Dialog website or DeepLink action | “navigate” | “NavigateToLink” |
| Survey completed | “submit” | “Survey” |
| Survey closed without completing | “cancel” if not started “cancel_partial” if started | “Survey” |
| Message Center message from the dashboard was displayed in Message Center | “read” | “MessageCenter” |
| Message Center message from the consumer was sent | “send” | “MessageCenter” |
| Message Center closed | “close” when from X in toolbar “cancel” when from back button | “MessageCenter” |
| Message Center profile opened | “profile_open” | “MessageCenter” |
| Message Center profile closed | “profile_close” | “MessageCenter” |
| Message Center profile updated | “profile_submit” | “MessageCenter” |
| Google Play In-App Review requested | “request” | “InAppRatingDialog” |
| Google Play In-App Review shown (Determined by Google’s Play SDK) | “shown” | “InAppRatingDialog” |
| Google Play In-App Review not shown (Determined by Google’s Play SDK) | “not_shown” | “InAppRatingDialog” |
| Alchemer Mobile Rating Dialog “rate” action | “rate” then “open_app_store_url” | “RatingDialog” for “rate” “AppStoreRating” for “open_app_store_url” |
| Alchemer Mobile Dialog “remind” action | “remind” | “RatingDialog” |
| Alchemer Mobile Dialog “decline” action | “decline” | “RatingDialog” |
Can Show Interaction
If you need to check that an Interaction will show before attempting to engage with it (for example: whether a button linked to a survey should be visible or not), you can call Apptentive.canShowInteraction("YOUR_EVENT") to check the behavior beforehand.
Kotlin:
override fun onCreate(savedInstanceState: Bundle?) {
    super.onCreate(savedInstanceState)
    ...

    val surveyButton = findViewById<Button>(R.id.survey_button)
    surveyButton.isVisible = Apptentive.canShowInteraction("survey")
    surveyButton.setOnClickListener {
       Apptentive.engage("survey")
    }
}
Java:
@Override
protected void onCreate(Bundle savedInstanceState) {
    super.onCreate(savedInstanceState);
    ...

    Button surveyButton = findViewById(R.id.survey_button);

    Boolean canShowSurvey = Apptentive.canShowInteraction("survey");
    surveyButton.setVisibility(canShowSurvey ? View.VISIBLE : View.GONE);

    surveyButton.setOnClickListener(v -> Apptentive.engage("survey"));
}
Message Center
Showing Message Center
With the Alchemer Mobile Message Center, your customers can send feedback, and you can reply, all without making them leave the app. Handling support inside the app will increase the number of support messages received and ensure a better customer experience.
Message Center lets customers see all the messages they have sent you, read all of your replies, and even send screenshots that may help solve issues.
Find a place in your app where you can add a button that opens Message Center. Your settings page is a good place.
Kotlin:
override fun onCreate(savedInstanceState: Bundle?) {
    super.onCreate(savedInstanceState)
    setContentView(R.layout.settings_layout)
    val button = findViewById<Button>(R.id.message_center_button)
    button.setOnClickListener {
        Apptentive.showMessageCenter()
    }
}
Java:
@Override
protected void onCreate(Bundle savedInstanceState) {
    super.onCreate(savedInstanceState);
    setContentView(R.layout.settings_layout);

    Button button = findViewById(R.id.message_center_button);
    button.setOnClickListener(v -> Apptentive.showMessageCenter());
}
Event Names
Our web dashboard works best for up to several dozen unique event names. It does not work well if you auto-generate thousands of unique event names. If you plan to target users based on viewing a piece of content out of a collection of hundreds or thousands (say, SKUs in an online retail app), do not create event names for each piece of content. Instead, you can use Custom Person Data for items viewed.
For example, you could set a key viewed_item with a value 123456. You could then target users for whom that key matches.
Message Center Data Monitoring
Message Center data monitoring will allow you to listen to and act on important data returned by Message Center in the Alchemer Mobile SDK.
The SDK will post a MessageCenterNotification data class to the messageCenterNotificationObservable Observable from the Apptentive.kt class when Message Center data is changed.
The MessageCenterNotification data class returns a canShowMessageCenter Boolean, a unreadMessageCount Int, a personName String, and a personEmail String.
canShowMessageCenterwhether the Message Center interaction will show withApptentive.showMessageCenter()unreadMessageCountthe count of unread messages in Message CenterpersonNamethe current set name of the customer. The customer can change it in Message CenterpersonEmailthe current set email of the customer. The customer can change it in Message Center if it is set to optional.
Kotlin:
Apptentive.messageCenterNotificationObservable.observe { notification ->
    val notificationText =
        "Can Show Message Center: ${notification?.canShowMessageCenter}. " +
            "Unread Message Count: ${notification?.unreadMessageCount}. " +
            "Person Name: ${notification?.personName}. " +
            "Person Email: ${notification?.personEmail}"

    Log.d("APPTENTIVE_MC_EVENT", notificationText)

    runOnUiThread {
        binding.messageCenterButton.isEnabled = notification?.canShowMessageCenter == true

        notification?.unreadMessageCount?.let {
            binding.unreadMessagesText.text = "Unread Messages: $it"
        }
    }
}
Java:
@Override
protected void onCreate(@Nullable Bundle savedInstanceState) {
    super.onCreate(savedInstanceState);
    ...

    Apptentive.getMessageCenterNotificationObservable().observe(this::handleMessageCenterNotification);
}

public Unit handleMessageCenterNotification(MessageCenterNotification notification) {
    String notificationText = "Can show Message Center: " + notification.getCanShowMessageCenter() + ". " +
            "Unread message count: " + notification.getUnreadMessageCount() + ". " +
            "Person name: " + notification.getPersonName() + ". " +
            "Person email: " + notification.getPersonEmail();

    Log.d("APPTENTIVE_MC_EVENT", notificationText);

    // Message Center data handling example
    runOnUiThread (new Thread(() -> {
        binding.messageCenterButton.setEnabled(notification.getCanShowMessageCenter());
        binding.unreadMessagesText.setText("Unread Messages: " + notification.getUnreadMessageCount());
    }));

    return Unit.INSTANCE;
}
Use Apptentive.messageCenterNotificationObservable.removeObserver(observer: (T) -> Unit) in the cleanup methods of your Activity and View models to avoid memory leak.
Hidden Attachments
Hidden attachments are messages that you can send from the SDK programmatically, which will be visible to you in the Dashboard under Conversations, but will not be visible to your customers in Message Center. They are great for sending contextual information or logs from rare crash events.
Attachment size shouldn’t exceed 15 MB. File size exceeding 15MB wouldn’t be sent to the server.
Kotlin:
/* Send hidden file using FileInputStream and MimeType */
fun sendFile(inputStream: FileInputStream, mimeType: String) {
  Apptentive.sendAttachmentFile(fis, mimeType)
}

/* Send hidden file using file's ByteArray and MimeType */
fun sendFile(content: ByteArray, mimeType: String) {
   Apptentive.sendAttachmentFile(content, mimeType)
}

/* Send hidden file using URI path */
fun sendFile(localResourceUri: String) {
   Apptentive.sendAttachmentFile(localResourceUri)
}
Java:
/* Send hidden file using FileInputStream and MimeType */
private void sendFile(FileInputStream inputStream, String mimeType) {
   Apptentive.sendAttachmentFile(fis, mimeType);
}

/* Send hidden file using file's ByteArray and MimeType */
private voide sendFile(ByteArray content, String mimeType){
   Apptentive.sendAttachmentFile(content, mimeType);
}

/* Send hidden file using URI path */
private void sendFile(String localResourceUri) {
   Apptentive.sendAttachmentFile(localResourceUri);
}
Hidden Text Messages
You can send hidden text messages through Alchemer Mobile SDK programmatically.
Kotlin:
// Send a text message.
Apptentive.sendAttachmentText("Message to display in the conversation view.")
Java:
// Send a text message.
Apptentive.sendAttachmentText("Message to display in the conversation view.");
Push Notifications
Alchemer Mobile can send Push Notifications to ensure your customers see your replies to their feedback in Message Center.
Supported Push Providers
- Firebase Cloud Messaging (FCM)
Other Push Providers
Amazon AWS SNS, and Parse both utilize FCM, so the process should be the same or similar between integrations
Firebase Cloud Messaging (FCM)
If you are using Firebase Cloud Messaging directly, without another push provider layered on top, please follow these instructions.
- Set Up a Firebase Cloud Messaging Client App
- Create and set your Messaging API key
- Log in to the Firebase console .
- Either create a new project or open an existing project that you want to configure with Airship.
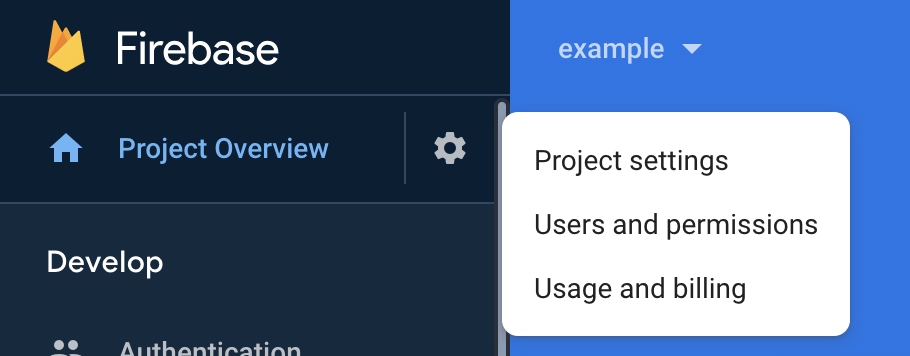
- In the left side menu, click the little gear and select Project settings.
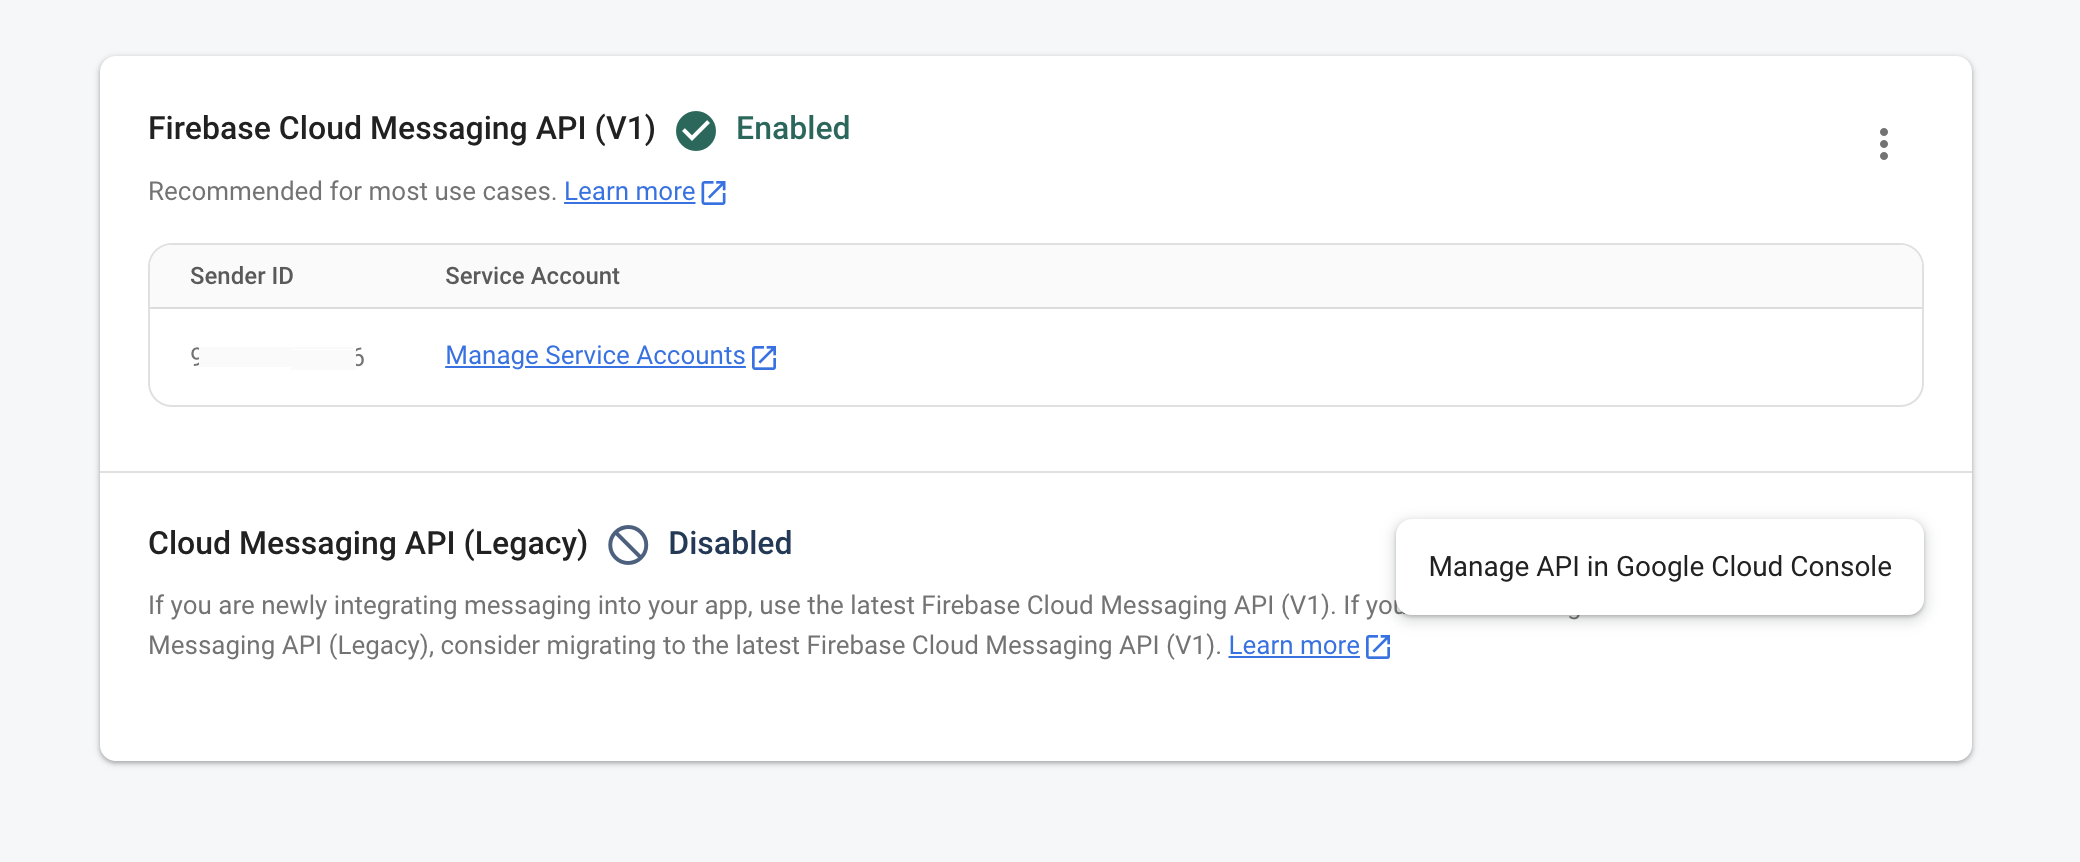
- Select Cloud Messaging from the options at the top of the screen, then click the three vertical dots for Cloud Messaging API (Legacy) and select Manage API in Google Cloud Console.
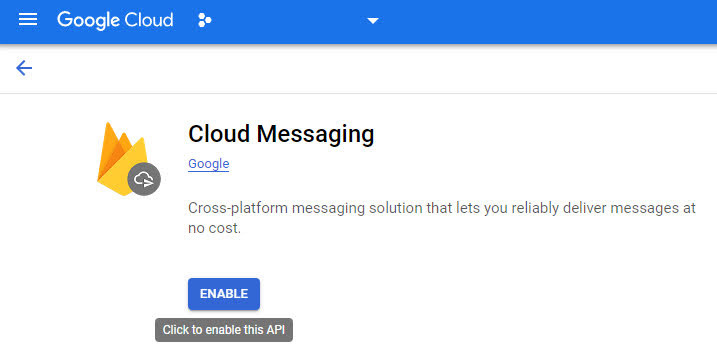
- Click ENABLE in the Google Cloud Console.
- Return to the Firebase console and open your project.
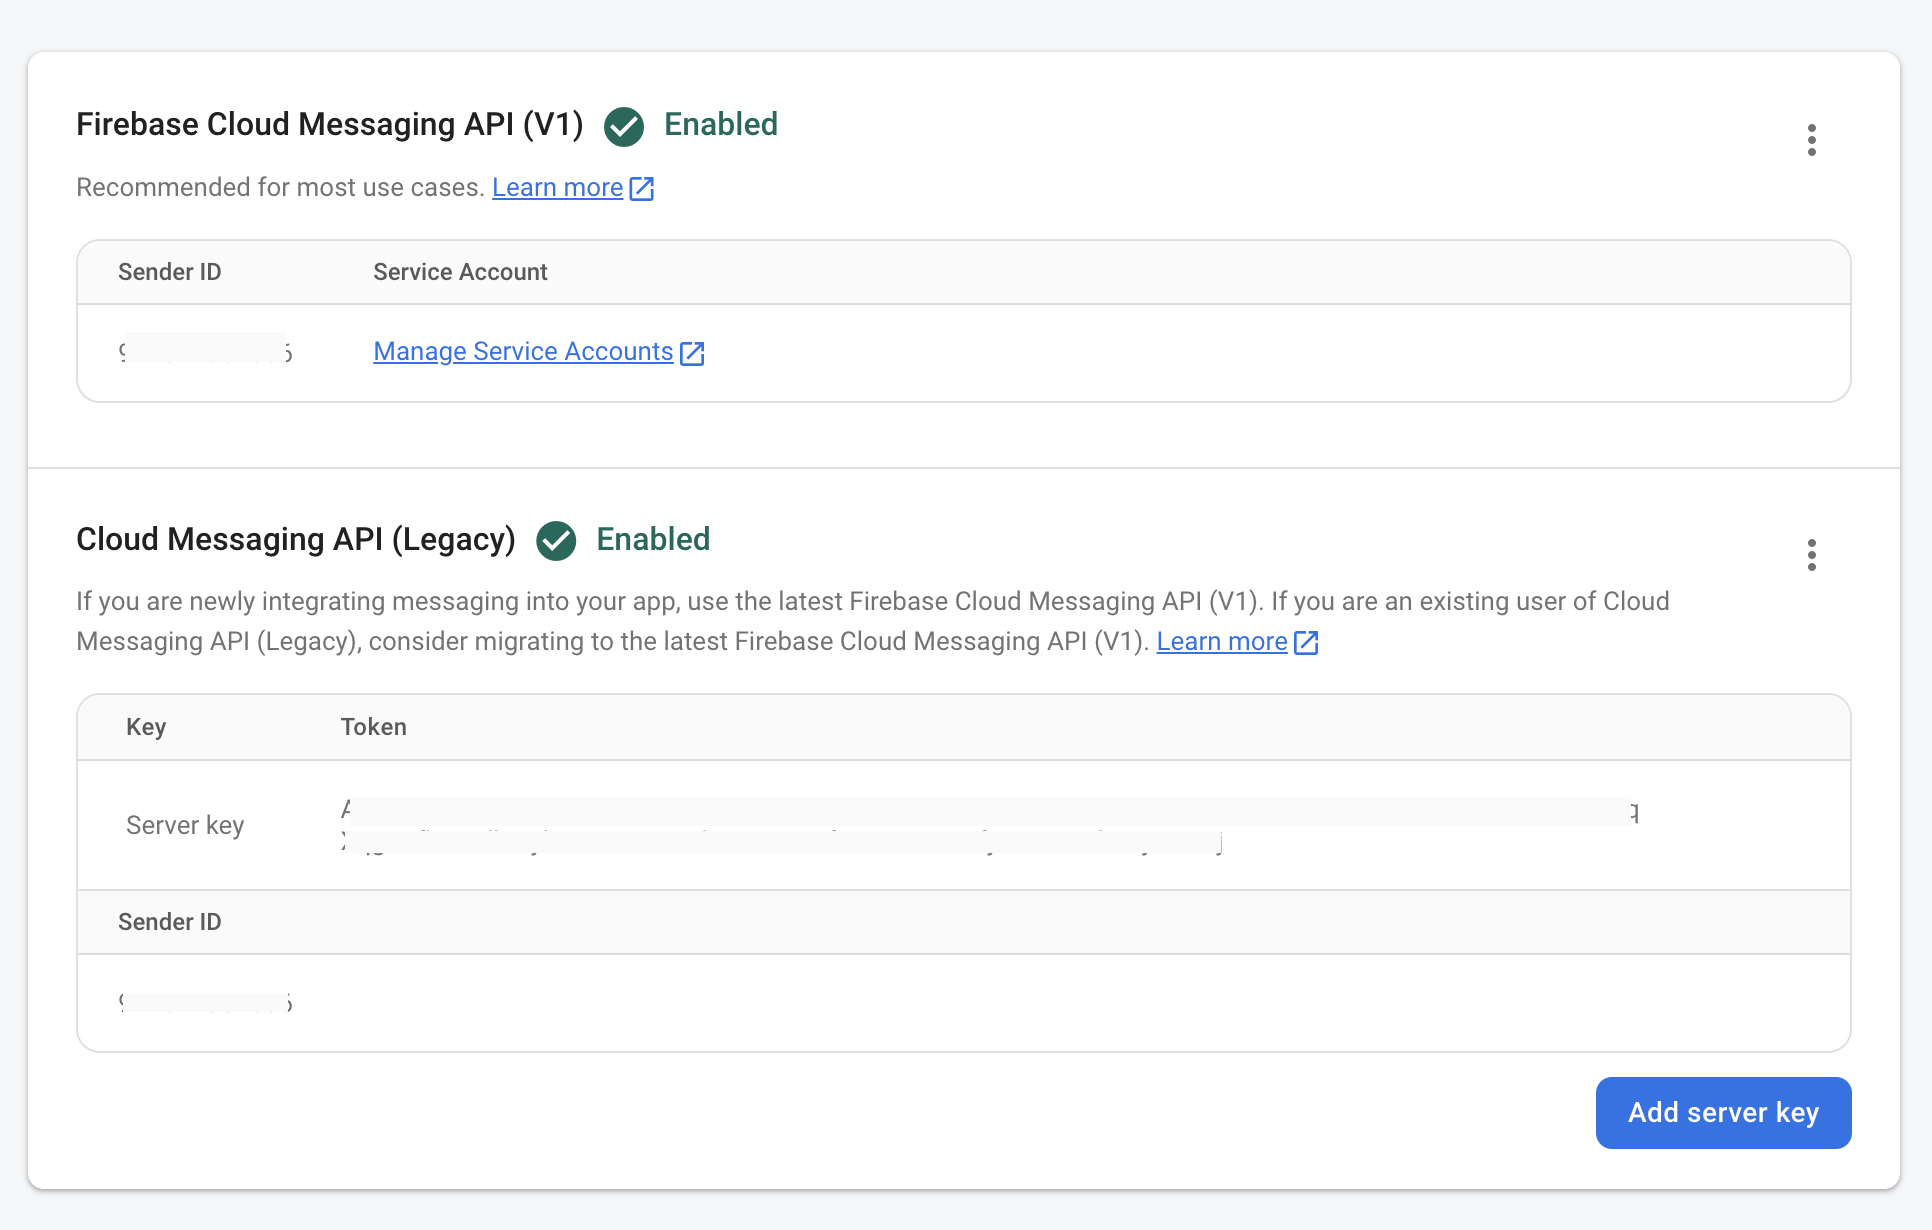
- In the left side menu, click the little gear and select Project settings.
- Select Cloud Messaging from the options at the top of the screen, then copy the Server key from the Cloud Messaging API (Legacy) section.
- Enter this key in the Alchemer Mobile Push integration
- Set up Alchemer Mobile to handle Push Notifications
New in 6.0.0
You now need to pass a Context into the Apptentive.setPushNotificationIntegration and Apptentive.buildPendingIntentFromPushNotification functions. This is to help prevent memory leaks from occurring in your app.
This can be either an Activity or Application context. In this example we just use this, which will take whatever context the FirebaseMessagingService provides.
- In your
FirebaseMessagingService, pass Alchemer Mobile your token.
Kotlin:
override fun onNewToken(token: String) {
    super.onNewToken(token)
    Apptentive.setPushNotificationIntegration(this, Apptentive.PUSH_PROVIDER_APPTENTIVE, token)
}
Java:
@Override
public void onNewToken(String token) {
    super.onNewToken(token);
    Apptentive.setPushNotificationIntegration(this, Apptentive.PUSH_PROVIDER_APPTENTIVE, token);
}
2. Still in your FirebaseMessagingService, get the title, body, and PendingIntent from the incoming push, and create a Notification to display to your customer. If the returned PendingIntent is null, then the push did not come from Alchemer Mobile, and you should handle it yourself.
You need to create a notification channel for Android-O+. (API 26+)
Kotlin:
override fun onMessageReceived(remoteMessage: RemoteMessage) {
    super.onMessageReceived(remoteMessage)
    val data = remoteMessage.data
    if (isAppInBackground() && Apptentive.isApptentivePushNotification(data)) {
            Apptentive.buildPendingIntentFromPushNotification(this, { pendingIntent ->
            if (pendingIntent != null) {
                val title = Apptentive.getTitleFromApptentivePush(data)
                val body = Apptentive.getBodyFromApptentivePush(data)

                // IMPORTANT: you need to create a notification channel for Android-O
                val notificationManager = getSystemService(NOTIFICATION_SERVICE) as NotificationManager
                if (Build.VERSION.SDK_INT >= Build.VERSION_CODES.O) createNotificationChannel(notificationManager)
                val defaultSoundUri = RingtoneManager.getDefaultUri(RingtoneManager.TYPE_NOTIFICATION)
                val notificationBuilder = NotificationCompat.Builder(this, CHANNEL_ID)
                        // Make sure that your icon follows Google's Guidelines : a white icon with transparent background
                        .setSmallIcon(R.drawable.ic_apptentive_notification)
                        .setContentTitle(title)
                        .setContentText(body)
                        .setAutoCancel(true)
                        .setSound(defaultSoundUri)
                        .setContentIntent(pendingIntent)
                // Use APPTENTIVE_NOTIFICATION_ID to dismiss relevant notifications when Message Center is shown
                notificationManager.notify(Apptentive.APPTENTIVE_NOTIFICATION_ID, notificationBuilder.build())
            } else {
                // Push notification was not for the active conversation. Do nothing.
            }
        }, data)
    } else {
        // This push did not come from Apptentive. It should be handled by your app.
    }
}

/**
 * Help manage whether notifications show in the foreground
 */
private fun isAppInBackground(): Boolean {
    return ActivityManager.RunningAppProcessInfo().run {
        ActivityManager.getMyMemoryState(this)
        importance != ActivityManager.RunningAppProcessInfo.IMPORTANCE_FOREGROUND
    }
}

/**
 * Create the NotificationChannel, but only on API 26+ because
 * the NotificationChannel class is new and not in the support library
 */
@RequiresApi(Build.VERSION_CODES.O)
private fun createNotificationChannel(notificationManager: NotificationManager) {
    val channel = NotificationChannel(CHANNEL_ID, "Message Center", NotificationManager.IMPORTANCE_HIGH)
    channel.description = "A messaging service to communicate with the company."
    notificationManager.createNotificationChannel(channel)
}

companion object {
    private const val CHANNEL_ID = "com.apptentive.NOTIFICATION_CHANNEL_MESSAGE_CENTER"
}
Java:
private final String CHANNEL_ID = "com.apptentive.NOTIFICATION_CHANNEL_MESSAGE_CENTER";

@Override
public void onMessageReceived(RemoteMessage remoteMessage) {
    super.onMessageReceived(remoteMessage);
    final Map data = remoteMessage.getData();
    if (isAppInBackground() && Apptentive.isApptentivePushNotification(data)) {
        Apptentive.buildPendingIntentFromPushNotification(this, new ApptentivePendingIntentCallback() {
            @Override
            public void onPendingIntent(PendingIntent pendingIntent) {
                if (pendingIntent != null) {
                    String title = Apptentive.getTitleFromApptentivePush(data);
                    String body = Apptentive.getBodyFromApptentivePush(data);

                    // IMPORTANT: you need to create a notification channel for Android-O
                    NotificationManager notificationManager = (NotificationManager) getSystemService(Context.NOTIFICATION_SERVICE);
                    if (Build.VERSION.SDK_INT >= Build.VERSION_CODES.O) createNotificationChannel(notificationManager);
                    Uri defaultSoundUri = RingtoneManager.getDefaultUri(RingtoneManager.TYPE_NOTIFICATION);
                        NotificationCompat.Builder notificationBuilder = new NotificationCompat.Builder(this, CHANNEL_ID)
                            .setSmallIcon(R.drawable.ic_apptentive_notification)
                            .setContentTitle(title)
                            .setContentText(body)
                            .setAutoCancel(true)
                            .setSound(defaultSoundUri)
                            .setContentIntent(pendingIntent);
                     // Use APPTENTIVE_NOTIFICATION_ID to dismiss relevant notifications when Message Center is shown

                    notificationManager.notify(Apptentive.APPTENTIVE_NOTIFICATION_ID, notificationBuilder.build());
                } else {
                    // Push notification was not for the active conversation. Do nothing.
                }
            }, data);
        } else {
            // This push did not come from Apptentive. It should be handled by your app.
        }
    }
}

/**
 * Help manage whether notifications show in the foreground
 */
private void isAppInBackground(): Boolean {
    return ActivityManager.getMyMemoryState(ActivityManager.RunningAppProcessInfo()) != ActivityManager.RunningAppProcessInfo.IMPORTANCE_FOREGROUND;
}

/**
 * Create the NotificationChannel, but only on API 26+ because
 * the NotificationChannel class is new and not in the support library
 */
private void createNotificationChannel(NotificationManager notificationManager) {
    NotificationChannel channel = NotificationChannel(CHANNEL_ID, "Message Center", NotificationManager.IMPORTANCE_HIGH);
    channel.setDescription("A messaging service to communicate with the company.");
    notificationManager.createNotificationChannel(channel);
}
Urban Airship
If you are already using Airship to send pushes to your app, follow these instructions. If you are not currently using push notifications in your app, we recommend integrating with FCM instead.
New in 6.0.0
You now need to pass a Context into the Apptentive.setPushNotificationIntegration and Apptentive.buildPendingIntentFromPushNotification functions. This is to help prevent memory leaks from occurring in your app.
This can be either an Activity or Application context. In this example we just use this, which will take whatever context the FirebaseMessagingService provides.
- In your
AirshipReceiver, pass us the Channel ID when it is created or updated.
Kotlin:
fun onChannelCreated(channelId: String) {
    Log.i(TAG, "Channel created $channelId")
    Apptentive.setPushNotificationIntegration(this, Apptentive.PUSH_PROVIDER_URBAN_AIRSHIP, channelId)
}

fun onChannelUpdated(channelId: String) {
    Log.i(TAG, "Channel updated $channelId")
    Apptentive.setPushNotificationIntegration(this, Apptentive.PUSH_PROVIDER_URBAN_AIRSHIP, channelId)
}
Java:
public void onChannelCreated(String channelId) {
    Log.i(TAG, "Channel created " + channelId);
    Apptentive.setPushNotificationIntegration(this, Apptentive.PUSH_PROVIDER_URBAN_AIRSHIP, channelId);
}

fun onChannelUpdated(channelId: String) {
    Log.i(TAG, "Channel updated " + channelId);
    Apptentive.setPushNotificationIntegration(this, Apptentive.PUSH_PROVIDER_URBAN_AIRSHIP, channelId);
}
2. When your AirshipReceiver receives a push, if it came from Alchemer Mobile, extract the title, body, and aPendingIntent, and use them to construct a Notification object. If the PendingIntent is null, the push did not come from Alchemer Mobile, and you will need to handle it yourself.
Kotlin:
fun onPushReceived(message: PushMessage, notificationPosted: Boolean) {
    val data = remoteMessage.pushBundle
    if (isAppInBackground() && Apptentive.isApptentivePushNotification(data)) {
            Apptentive.buildPendingIntentFromPushNotification(this, { pendingIntent ->
            if (pendingIntent != null) {
                val title = Apptentive.getTitleFromApptentivePush(data)
                val body = Apptentive.getBodyFromApptentivePush(data)

                // IMPORTANT: you need to create a notification channel for Android-O
                val notificationManager = getSystemService(NOTIFICATION_SERVICE) as NotificationManager
                if (Build.VERSION.SDK_INT >= Build.VERSION_CODES.O) createNotificationChannel(notificationManager)
                val defaultSoundUri = RingtoneManager.getDefaultUri(RingtoneManager.TYPE_NOTIFICATION)
                val notificationBuilder = NotificationCompat.Builder(this, CHANNEL_ID)
                        // Make sure that your icon follows Google's Guidelines : a white icon with transparent background
                        .setSmallIcon(R.drawable.ic_apptentive_notification)
                        .setContentTitle(title)
                        .setContentText(body)
                        .setAutoCancel(true)
                        .setSound(defaultSoundUri)
                        .setContentIntent(pendingIntent)
                // Use APPTENTIVE_NOTIFICATION_ID to dismiss relevant notifications when Message Center is shown

                notificationManager.notify(Apptentive.APPTENTIVE_NOTIFICATION_ID, notificationBuilder.build())
            } else {
                // Push notification was not for the active conversation. Do nothing.
            }
        }, data)
    } else {
        // This push did not come from Apptentive. It should be handled by your app.
    }
}

/**
 * Help manage whether notifications show in the foreground
 */
private fun isAppInBackground(): Boolean {
    return ActivityManager.RunningAppProcessInfo().run {
        ActivityManager.getMyMemoryState(this)
        importance != ActivityManager.RunningAppProcessInfo.IMPORTANCE_FOREGROUND
    }
}

/**
 * Create the NotificationChannel, but only on API 26+ because
 * the NotificationChannel class is new and not in the support library
 */
private fun createNotificationChannel(notificationManager: NotificationManager) {
    val channel = NotificationChannel(CHANNEL_ID, "Message Center", NotificationManager.IMPORTANCE_HIGH)
    channel.description = "A messaging service to communicate with the company."
    notificationManager.createNotificationChannel(channel)
}

companion object {
    private const val CHANNEL_ID = "com.apptentive.NOTIFICATION_CHANNEL_MESSAGE_CENTER"
}
Java:
private final String CHANNEL_ID = "com.apptentive.NOTIFICATION_CHANNEL_MESSAGE_CENTER";

@Override
public void onPushReceived(PushMessage pushMessage) {
    Bundle data = pushMessage.getPushBundle();
    if (isAppInBackground() && Apptentive.isApptentivePushNotification(data)) {
        Apptentive.buildPendingIntentFromPushNotification(this, new ApptentivePendingIntentCallback() {
            @Override
            public void onPendingIntent(PendingIntent pendingIntent) {
                if (pendingIntent != null) {
                    String title = Apptentive.getTitleFromApptentivePush(data);
                    String body = Apptentive.getBodyFromApptentivePush(data);

                    // IMPORTANT: you need to create a notification channel for Android-O
                    NotificationManager notificationManager = (NotificationManager) getSystemService(Context.NOTIFICATION_SERVICE);
                    if (Build.VERSION.SDK_INT >= Build.VERSION_CODES.O) createNotificationChannel(notificationManager);
                    Uri defaultSoundUri = RingtoneManager.getDefaultUri(RingtoneManager.TYPE_NOTIFICATION);
                        NotificationCompat.Builder notificationBuilder = new NotificationCompat.Builder(this, CHANNEL_ID)
                            .setSmallIcon(R.drawable.ic_apptentive_notification)
                            .setContentTitle(title)
                            .setContentText(body)
                            .setAutoCancel(true)
                            .setSound(defaultSoundUri)
                            .setContentIntent(pendingIntent);
                     // Use APPTENTIVE_NOTIFICATION_ID to dismiss relevant notifications when Message Center is shown

                    notificationManager.notify(Apptentive.APPTENTIVE_NOTIFICATION_ID, notificationBuilder.build());
                } else {
                    // Push notification was not for the active conversation. Do nothing.
                }
            }, data);
        } else {
            // This push did not come from Apptentive. It should be handled by your app.
        }
    }
}

/**
 * Help manage whether notifications show in the foreground
 */
private void isAppInBackground(): Boolean {
    return ActivityManager.getMyMemoryState(ActivityManager.RunningAppProcessInfo()) != ActivityManager.RunningAppProcessInfo.IMPORTANCE_FOREGROUND
}

/**
 * Create the NotificationChannel, but only on API 26+ because
 * the NotificationChannel class is new and not in the support library
 */
private void createNotificationChannel(NotificationManager notificationManager) {
    NotificationChannel channel = NotificationChannel(CHANNEL_ID, "Message Center", NotificationManager.IMPORTANCE_HIGH);
    channel.setDescription("A messaging service to communicate with the company.");
    notificationManager.createNotificationChannel(channel);
}
Interactions
All of the following Interactions can be configured in the Alchemer Mobile Dashboard to show up when any of your Events are engaged.
Love Dialog & Rating Dialog
Love Dialogs can help learn about your customers, ask customers that love your app to rate it in the applicable app store, and ask customers who don’t love it yet to give you feedback or answer a Survey.
Prompting customers to leave ratings and reviews with an In-App Review is a great way to engage customers and request feedback.
Google In-App Review pre-requisites
If your app implements specific Play Core or Play Services library versions, the Google In-App Review requires at least Play Core version 1.8.0 and Play Services Base 17.4.0.
For more info: How to Use the Love Dialog and Rating Dialog
Rating Dialog for Alternate App Stores
If you host your app in an app store other than Google Play, you will need to make sure customers who want to rate your app will be able to do so.
To learn more about this feature and how to enable the Alchemer Mobile Rating Dialog, read the Alchemer Mobile Rating Dialog article.
Surveys
Surveys are a powerful tool for learning about your customers’ needs.
For more info: How to Use Surveys
Prompts
Prompts (formerly Notes) allow you to show an alert to customers, and optionally direct them to a Survey, Message Center, Deep Link, Website Link, or simply dismiss the Prompt.
For more info: How to Use Prompts
Customer Information
Set Customer Contact Information
If you already know the customer’s email address or name, you can pass them to us to display in the conversation view on your Alchemer Mobile dashboard. Both functions take in a type of String
Kotlin:
Apptentive.setPersonName("First Last")
Apptentive.setPersonEmail("name@example.com")
Java:
Apptentive.setPersonName("First Last");
Apptentive.setPersonEmail("name@example.com");
Get Customer Contact Information
Message Center provides dialogs that allow your customers to set their name and email as well. Calling the above methods will overwrite what your customer enters. If you don’t want to overwrite what they enter, you can check their values first. Both functions return a String.
Kotlin:
Apptentive.getPersonEmail()
Apptentive.getPersonName()
Java:
Apptentive.getPersonEmail();
Apptentive.getPersonName();
Custom Data
You can send Custom Data associated with a person’s profile that is using the app, or the device. In particular, this is useful for sending a Customer ID and other information that helps you understand and support your users better. Custom Data can also be used for configuring when Interactions will run. You can add custom data of type String, Number, or Boolean.
In general, Custom Data can be sent as Person Custom Data or Device Custom Data. However, if sending a Customer ID, you must send it as Person Custom Data. For more on the benefits of setting a Customer ID, see here.
After the Custom Data field has been triggered, it will appear on the targeting screen for any Interaction within a few minutes. You may need to refresh your browser to see recent changes.
Kotlin:
// Custom Person Data
Apptentive.addCustomPersonData("number_example", 1234567890)
Apptentive.addCustomPersonData("string_example", "String")
Apptentive.addCustomPersonData("boolean_example", true)

// Custom Device Data
Apptentive.addCustomDeviceData("number_example", 1234567890)
Apptentive.addCustomDeviceData("string_example", "String")
Apptentive.addCustomDeviceData("boolean_example", true)
Java:
// Custom Person Data
Apptentive.addCustomPersonData("number_example", 1234567890);
Apptentive.addCustomPersonData("string_example", "String");
Apptentive.addCustomPersonData("boolean_example", true);

// Custom Device Data
Apptentive.addCustomDeviceData("number_example", 1234567890);
Apptentive.addCustomDeviceData("string_example", "String");
Apptentive.addCustomDeviceData("boolean_example", true);
Customer Authentication
If your app involves sensitive data and is likely to be used by multiple customers on the same device, you can use Customer Authentication to protect a customer’s information after they log out of your app.
Customer Authentication requires that you have authentication built into your app, and will also require you to modify your server’s authentication code to pass authentication information back to your app, and then to the Alchemer Mobile (ApptentiveKit) SDK. For more information on this feature, see our Customer Authentication Configuration.
If you do not want to use Customer Authentication, or don’t have an authentication mechanism in your app, then Alchemer Mobile will still function, but all information will be stored in the same conversation.
How we log a customer in
Your server will authenticate a customer when they log in. At that time, you will need to generate a JSON Web Token (JWT) with a specific format, and signed with the JWT Signing Secret in your app’s API & Development page. The JWT should contain the following claims:
- A subject (sub) claim that uniquely identifies the customer
- An issuer (iss) claim corresponding to your company
- An issued-at (iat) claim corresponding to the date/time of issue
- An expiry (exp) claim corresponding to the expiration date. Note that expiry dates are capped at three days after the issued-at date.
The resulting JWT should be signed with the JWT Signing Secret in your app’s API & Development page using the HS-512 algorithm
Alchemer Mobile will securely manage the JWT. It is important to never reuse a JWT and NEVER INCLUDE THE JWT SIGNING SECRET IN YOUR APP or anywhere it could be accessed by unauthorized parties.
Logging a Customer In
The JWT will be a string. When your server generates a JWT, you will need to send it back to your app, and then log in to Alchemer Mobile with it. You will also need to pass in a callback that will allow you to handle login failures.
Apptentive.login(token) { loginResult ->
  when (loginResult) {
    is LoginResult.Success -> {
      // Successful Login
    }
    is LoginResult.Error -> {
      //  Either the passed jwt token was invalid or the SDK is in a state like already logged in
* or not initialized yet and therefore cannot login

    }
    is LoginResult.Failure -> {
      // Login request was sent but failed with a response code
    }
    is LoginResult.Exception -> {
      // During the login process an exception was thrown
    }
  }
}
Logging a Customer Out
You should make sure to log a customer out any time you invalidate the customers session in your app. That means that when a customer explicitly logs out, you should also log them out of Alchemer Mobile. When they are logged out after a certain amount of time, you should likewise also log them out of Alchemer Mobile.
Apptentive.logout()
If your customer has logged out of your app, but you don’t log them out of Alchemer Mobile, their personal information may be visible to other app users.
Handling Authentication Failures
The JWT you create will have an expiration date, and will be signed with a secret. When the JWT expires, the server will reject any requests made with it. So, it should be periodically refreshed using updateToken method.
It is a good practice to choose an expiration that is longer than your normal session duration so that Alchemer Mobile does not cause your customer to need to re-authenticate.
Apptentive.updateToken(
  jwtToken
) { result ->
  when (result) {
    is LoginResult.Success -> {
      // Update token success
    }
    is LoginResult.Error -> {
      // Update token error
    is LoginResult.Failure -> {
      // Update token request was sent but failed with a response code
    }
    is LoginResult.Exception -> {
      // During the update token process an exception was thrown
    }
  }
If the JWT expires or otherwise becomes invalid, events, messages, survey responses and the like will pause sending. By implementing the AuthenticationFailedListener, the Alchemer Mobile SDK can notify your app and give your it an opportunity to refresh the JWT using the aforementioned method.
override fun onAuthenticationFailed(reason: AuthenticationFailedReason) {
  Apptentive.updateToken(jwtToken) {
    when (it) {
      is LoginResult.Success -> {
        // update token success
      }
      is LoginResult.Error -> {
        // Update token error
      }
      is LoginResult.Failure -> {
        Update token failure
      }
      is LoginResult.Exception -> {
        // Update token exception
      }
    }
  }
}
Logged Out Experience
When no customer is logged in, Alchemer Mobile public API methods will have no effect or in some cases return an error result.
If you are using Message Center, and the button that launches it is visible in a part of your app that your customers can access without logging in to your app, you should follow the Message Center instructions above to only show or enable the button when Message Center can be shown.
Permissions
Alchemer Mobile SDK requires some permissions to be granted for its operation. These are:
android.permission.ACCESS_NETWORK_STATE: Required to verify if network connectivity is available.android.permission.INTERNET: Required to actually transmit data to Apptentive servers.android.permission.POST_NOTIFICATIONS: Required for apps targeting API 33+ to send Push Notifications when a new Message is received in Message Center.
