Targeting helps you interact intelligently with customers, at the right place and right time. This page will get you started with targeting, along with sharing Alchemer's best practices for success.
Understanding Targeting
Targeting based on customer action is essential to success - this ensures you are asking for feedback once people have had a chance to experience your app or website, and are being shown content relevant to them. Through targeting, Alchemer Mobile makes interactions more impactful by helping you personalize them based on customer behavior.
In this doc, you’ll learn the WHO, WHERE, and HOW OFTEN/WHEN of targeting; why each point is important to your goals; and how to set up targeting within Alchemer Mobile.
Using Targeting
With Alchemer Mobile, there are three points to consider with regards to targeting: WHO, WHERE, and HOW OFTEN or WHEN. Each of these attributes helps ensure you interact with your customers at the right place and time, and with the right frequency. You want to be careful to be contextual and relevant while also not over-prompting your customers with requests for feedback or too-frequent messages.
To understand the importance of these points better, think about your experience while shopping at your favorite retail store. In-store sales associates won’t interrupt you in the middle of a conversation to ask if you need their assistance, and they won’t ask you if you need a fitting room before you’ve picked out any items of interest. In the same way, targeting allows you to communicate with specific customers once they have engaged with your app or website at a time that will not detract from their experience.
WHO Targeting
The first decision you must make is WHO should be targeted. Alchemer Mobile allows you to target based upon a number WHO attributes, including custom person and device data, actions people have taken within the app (or Events), and which interactions they have or have not seen in the past.
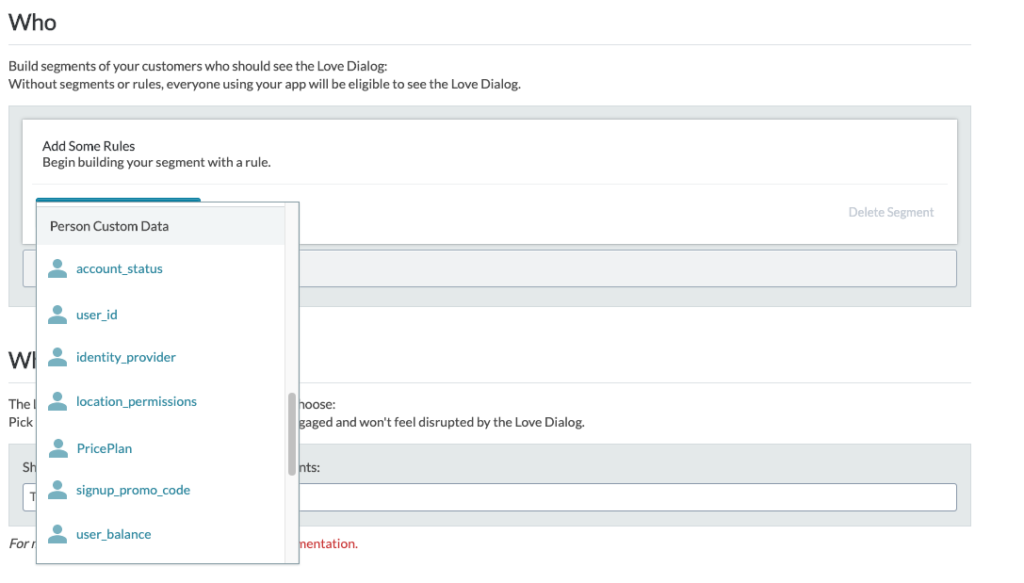
The first attribute, Person and Device Data, is defined as any attribute data that is collected within the app or browser and can be passed through to Alchemer Mobile. Mobile examples can be seen below:

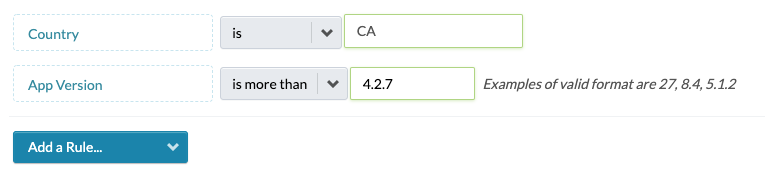
And here is a sample targeting segment, targeting to devices in Canada and on a specific app version or later:
Device and Person Custom Data are attributes of either your customer, or app or website settings that you can opt to pass through to Alchemer Mobile. Custom data is an excellent way to get hyper-specific and target your audience based on their profile information or other specifics collected as part of their app or website experience.
Examples of Person Custom Data are customer rewards level or zip code; examples of Device Customer Data are push notifications turned on or items favorited.
Another targeting attribute, Events, refer to specific times and places within the app that allow you to see how customers are utilizing the app. When integrating Events, you want to think holistically about your app or website experience and tag actions that people can take, as well as completed events such as purchase_complete or back and close buttons.
Events are the core of Alchemer Mobile targeting, and having a robust list of 20 - 50 meaningful Events is essential in ensuring that you can make the most of your Alchemer Mobile integration. To read more about Events, check out our Events Guide.
When targeting Events, you will have the following options:
- Count in installed version - resets on each app update and is recommended to use when you want to ensure someone has taken an action more recently. This targeting option is only applicable to apps as web browsers do not have this setting.
- Count - this is version agnostic and will collect over the entire lifecycle of a person using your app or website.
- Time since last seen - this allows you to set time-based targeting of more or less than a certain number of minutes, hours or days.
The final attribute, Has Seen Interaction, refers to whether or not customers have been exposed to a particular interaction or interaction type in the past. Previous interactions are tracked within Alchemer Mobile and include overarching types like all Prompts (formerly Notes), or a specific Prompt campaign, allowing for more flexibility with targeting.
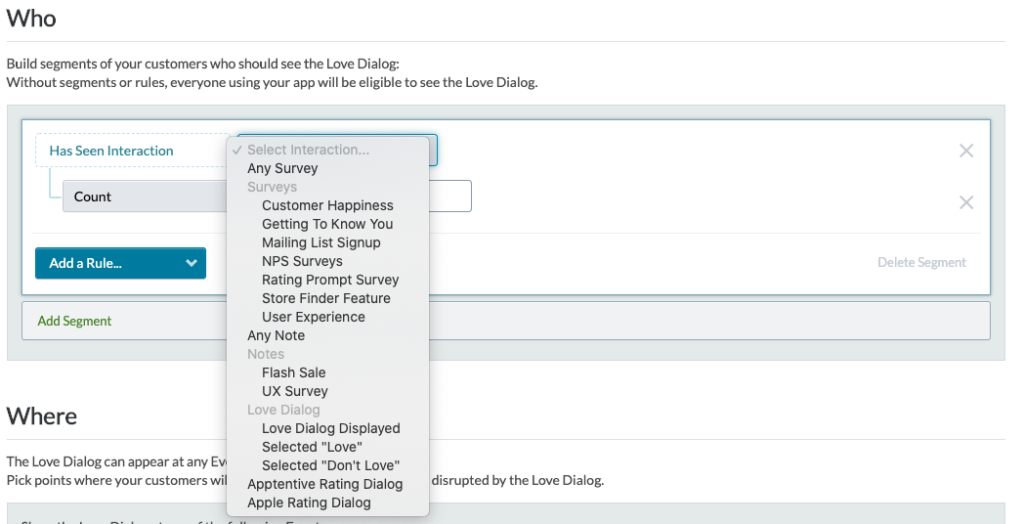
Here is a sample targeting segment, showing an interaction to someone who has not seen a Survey for at least the last 15 days: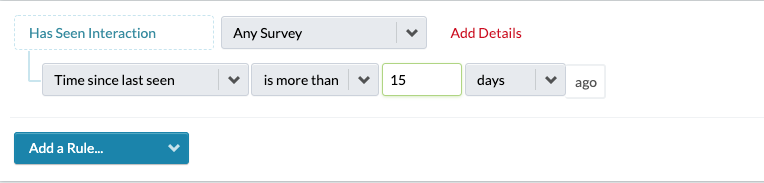
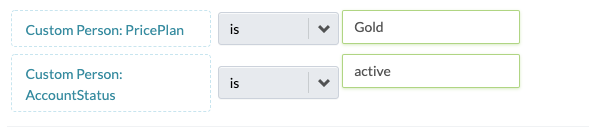
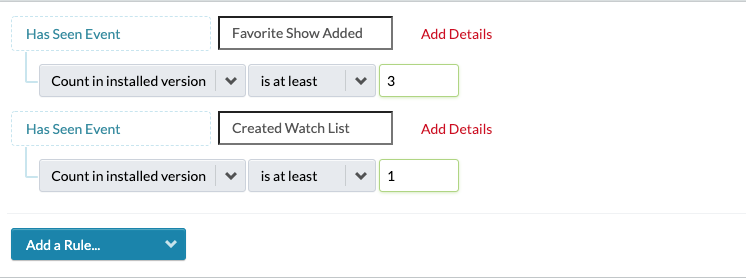
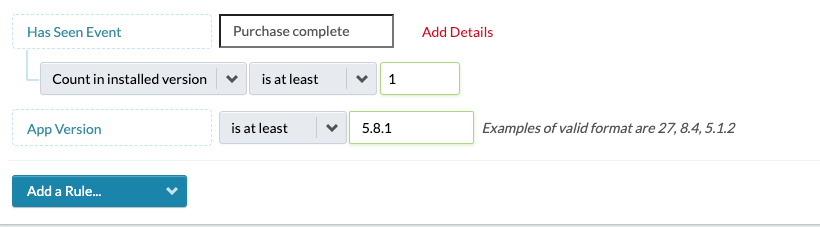
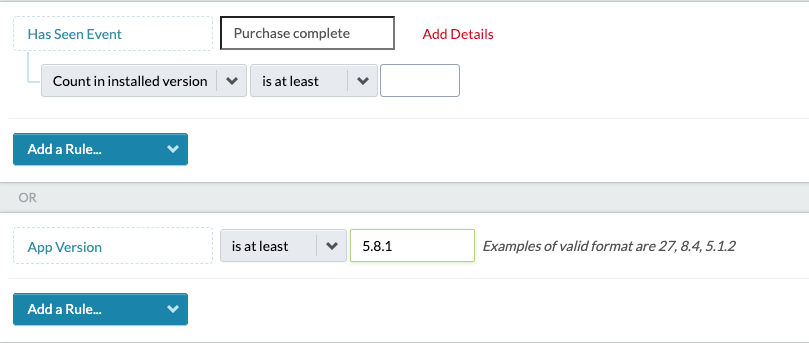
The different WHO targeting attributes can be used together to set different customer segments based upon AND and OR logic. For instance, you may want to choose to surface a Prompt offering a discount code to customers who are on your latest App Version AND who have completed a purchase, OR to surface it to customers who are on your latest App Version AND have seen a specific Interaction you’ve created (see example screenshot below). Both are possible utilizing Alchemer's targeting capabilities.
Best Practice: Create multiple, specific WHO segments that align with your interaction goals. If you have a Survey asking for feedback on a feature, target it to people who have used that feature a few times. Run a Prompt encouraging an app update to people only on older versions of your app. And show the Love and Rating Dialogs to people who have had time to experience your app, and have utilized key features. This will give you richer feedback and allow you to interact with your customers in a more meaningful way.
Upload Targeting Criteria
Upload Targeting Criteria allows you to manually add, paste, or upload a list for you to quickly build targeting criteria from. Use the Upload Targeting Criteria to geo-target customers by zip code/city/country, target companies by Store ID, target a segment by Customer ID, or think outside the box and create a list with your own custom metadata!
A few important things to know before getting started:
- This feature is available on iOS and Android SDK V3.4 and above
- This feature is available on all versions of the Web SDK
- Lists are currently limited to 1,000 values per interaction
- Any data used for targeting criteria must first be passed into Alchemer Mobile as custom data
- If exporting a list from Excel on a Windows machine, use the .txt file type instead of .csv as the 'Microsoft Excel CSV' format is slightly different than standard .csv files and may cause issues when trying to upload your list
How to Use
Within the WHO targeting segment of any interaction, select “Add a list to build targeting rules”.
Next, select the field you want to target. You can select any Person & Device Data, Person Custom Data, or Device Custom Data to target.
Target the specific list using the ‘is’ comparison to target customers who are exact matches to the uploaded list and configured rules. Use ‘contains’, ‘begins with’, or ‘ends with’ for matching the list to specified partial matches of the selected target field.
You can manually enter a list for targeting by typing in target values, or by pasting in the target value list. Target values must be separated by commas or a line break.
To upload a list from a .csv or .txt file, select ‘Add value from a file’ and upload the list from your computer. When uploading from a .txt file, each target value should be separated by commas or a line break.
From a .csv, the file must be a single column of data. If the .csv file includes a header, the header will be treated as a target value.
You can also provide target values with special characters by using escape characters or by wrapping the target value with quotes.
For example, these are valid inputs that include special characters: “Valid with \”quotes\” inside”, “valid with, a few, commas inside”.
Once the target values are added, they will display in the input field under the rule with a count of how many unique rules and duplicates there are. If duplicates are detected, they will be removed.
Once the interaction is live, it will only be shown to customers who match the criteria and values you provided for the targeting list.
Limits
You will only be allowed to input a total of 1,000 targeting criteria rules per interaction. This includes all values added in a target list, in addition to other targeting rules configured.
Example: a list of 1000 target values and an additional rule for has seen the account page puts the total targeting criteria over the maximum 1000 rules. An error message is displayed, and you must remove any additional rules to meet the maximum of 1000.
The 1,000 target rules maximum includes all target rules. If an additional segment is created to target ‘or’ values, they are included in the 1,000 maximum rules and an error message will be displayed preventing any additional rules from being added.
Example: Two segments are created targeting appVersion OR appCodeName. The two lists add up to over 1,000 targeting rules. An error message is displayed for each segment and no additional rules can be added.
If a list of over 1,000 values is uploaded or pasted into the target value field, an error message will be displayed.
WHERE Targeting
Once you determine WHO should be eligible for a particular interaction, you need to choose the place at which customers will see the interaction, which is a WHERE event.
A WHERE event should never disrupt the customer from using the app or website for their intended purpose. For instance, if you want to send a Love Dialog to someone who just successfully completed a purchase, you want to ensure the prompt does not interfere with the customer receiving the purchase confirmation number. In this case, a WHERE event such as purchase_complete_back_button would be a great option.
As is the case with WHO segments, you can also choose multiple events at which to surface a WHERE interaction. Once the WHO criteria is met, the customer will receive the interaction the next time they hit any of the applicable WHERE events.
Best Practice: Select more than one WHERE event to capture customers along different parts of their journey, and be sure to choose non-interruptive moments like back and close buttons, or after an action is completed.
HOW OFTEN and WHEN Targeting
The last piece of targeting you’ll need to consider is HOW OFTEN or WHEN to display the interaction. There are different options for this depending on the interaction type. Prompts each only display to a customer once ever, and you can pre-set a start and end date and time for each particular Prompt.
Surveys also allow you to pre-set a start and end date and time, as well as a response threshold for the survey. If you set a Survey to run for seven days or until you have 100 responses, the survey will stay active until the first threshold is hit, deactivating at that point. Surveys also allow you to decide if you would like to surface the same survey to someone multiple times and if you would like to accept multiple responses from the same person.
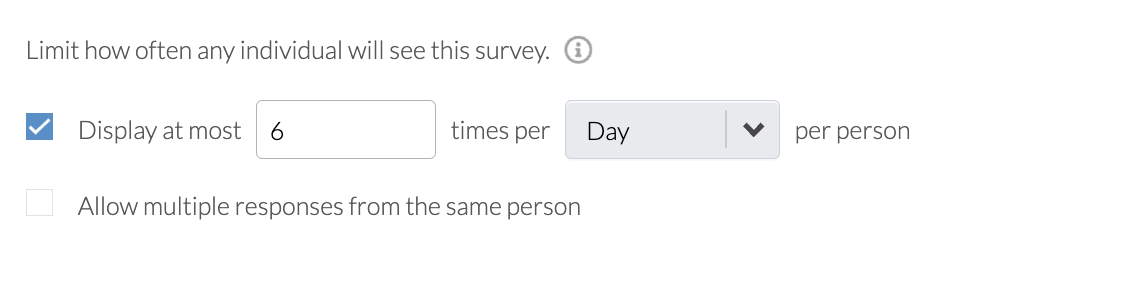
Best Practice: Displaying the Survey multiple times to the same person is advisable, however you’ll want to make sure you are not prompting them too frequently. Using “display at most x times per x per person allows you to control that frequency. Depending on how long your survey is running for, perhaps selecting 1 time per month, or week, would be a good option to ensure they do not trigger the survey every time they open your app or website.
Limit how often any individual will see the survey
This feature operates by dividing the specified time unit ( Day, Week, Month, Year, etc.) by the designated value. This division establishes time blocks, and a 'timer' is then activated to prevent the survey from reappearing within the duration of one of these blocks.
For example, if you've configured the survey to 'Display at most [6] times per [Day] per person,' the Day, representing a 24-hour period, is divided into 6 equal sections, resulting in 4-hour blocks.
Consequently, once the survey is initially presented, it cannot reappear for the same person until a 4-hour interval has elapsed since the initial invocation of the survey for that user.
Love and Rating Dialogs are shown, at most, once per device per app version. You can set additional parameters around the number of app launches a customer has performed in the installed app version and the number of days since they first utilized that version, as well as the amount of time that has passed since they last saw a Rating Dialog.
Best Practice: You should show the Love and Rating Dialogs to customers once per version, to capture sentiment over time, and ensure a consistent rating. Use the “Never show more than once per x days” to separate out those interactions by 90-120 days, which allows you to get a consistent pulse while not over-prompting your customers.
Video Overview: Using Targeting
