You will need to know your Alchemer Mobile (Apptentive) App ID in order to complete the integration steps below. The App ID can be found in the URL of each Alchemer Mobile (Apptentive) app. For instance, in the app URL: https://be.apptentive.com/apps/4eec2417687b69000100 where 4eec2417687b69000100 is the App ID. Once you have found your App ID, you can complete the instructions below.
The Alchemer Mobile Zendesk Integration automatically opens tickets in Zendesk and keeps them in sync when your customers provide feedback in-app. When you reply via Zendesk, the feedback is automatically routed back to the customer and displayed within your app in Message Center. Alchemer Mobile creates one Conversation per customer and only one active ticket in Zendesk will receive the messages a customer sends via Message Center. If there’s no currently active ticket in Zendesk for the customer, a new one will be created.
For each Alchemer Mobile app you would like to integrate with Zendesk, you will need to activate the Zendesk integration on our dashboard. On Alchemer Mobile's side, this requires the API token, email address, and subdomain associated with the Zendesk account. You will need to configure a single trigger and target on the Zendesk side, by using each Alchemer Mobile (Apptentive) App ID that you’d like the Zendesk integration to write to, which will link the accounts.
For example: https://notify2.apptentive.com/integrations/apps/APPID1,APPID2/zendesk. If you’d like to link your dev apps for testing, include those AppIDs as well.
Get Your Zendesk API Token
First, you’ll configure Alchemer Mobile (Apptentive) to post messages from Message Center into Zendesk using an API token.
- In Zendesk, go to: Admin Center → Apps and integrations → Zendesk API
- Enable Token Access
- Follow the instructions below and create a new API token with the description Apptentive Integration
- Copy the new API Token
- Go to your app’s Alchemer Mobile Integrations, and click Zendesk
- Paste the API Token in the API Token field
- Enter your Username (email address) and Zendesk Subdomain
- Enable the integration by toggling the Active toggle on Apptentive
- Optionally, configure your custom data
- Click Save
Configure Zendesk
Next, you’ll configure Zendesk so that any replies you send from Zendesk are routed back to your customers via Message Center. This step is required if you want customers to see those replies in Message Center, though you may want to use other methods of notifying customers instead of or in addition to this.
- In Zendesk, go to Admin Center → Apps and integrations → Targets
- Click add Target
- Click URL Target
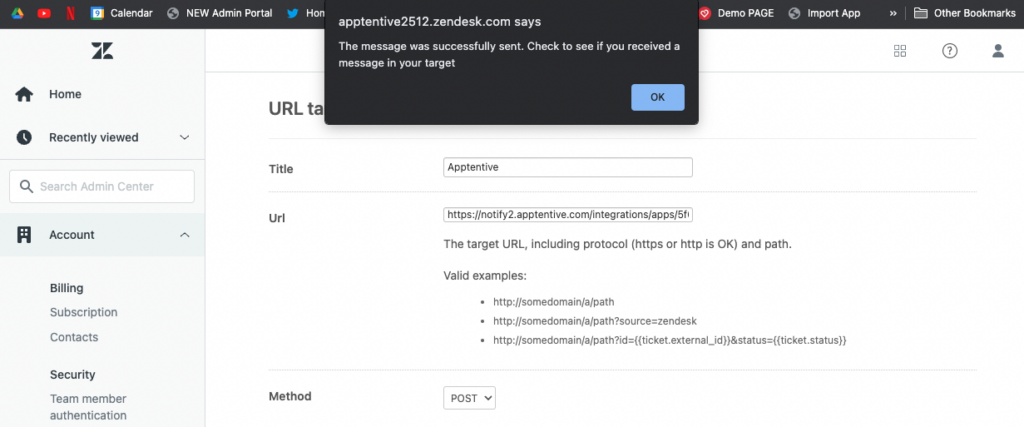
- Set Title to “Apptentive”
- Set URL to:
https://notify2.apptentive.com/integrations/apps/APPID1,APPID2/zendesk
- Make sure you replace
APPID1,APPID2(and so on) in the URL with all Apptentive App IDs. Each must be separated by a comma with no space. The order does not matter, but you must include all app IDs.- Example for a single app:
https://notify2.apptentive.com/integrations/apps/503ea820253aff102d9b1a1a/zendesk - Example for multiple apps:
https://notify2.apptentive.com/integrations/apps/503ea820253aff102d9b1a1a,5b3ea826253aff102d9baa1f,5f501361403664788400000d/zendesk
- Example for a single app:
- Set Method to
POST - Set Attribute Name to
data - Select Test Target, click Submit, and verify success. This will be indicated by a popup overlayed on your Zendesk dashboard.

- Select Create Target, and click Submit
- Go to Admin Center → Objects and rules → Business rules → Triggers
- Click Add trigger
- Set Trigger name to “Apptentive”
- Set Category to “Notifications”
- Under Meet ANY of the following conditions add all of the following:
- Status is… New
- Status is… Open
- Status is… Pending
- Status is… Solved
- Status is… Closed
- Under Actions:
- Select Notifications: Notify target
- Set Target to the Target Title above (e.g. “Apptentive”)
- Set Message to the following:
{ "ticket": { "id": {{ticket.id}}, "status": "{{ticket.status | downcase}}", "created_by": { "name": "{{ticket.requester.name}}", "email": "{{ticket.requester.email}}" } }, "message": { "id": {{ticket.latest_comment.id}}, "public": {{ticket.latest_comment.is_public}}, "created_at": "{{ticket.latest_comment.created_at_with_time | date: '%c'}}", "sender": { "name": "{{ticket.latest_comment.author.name}}", "email": "{{ticket.latest_comment.author.email}}" }, "attachments": [ {% for attachment in ticket.latest_comment.attachments %} { "name": "{{attachment.filename}}", "url": "{{attachment.url}}" } {% unless forloop.last %},{% endunless %} {% endfor %} ] } }--boundary-Zendesk-subject{{ticket.title}}--boundary-Zendesk-body{{ticket.latest_comment.value}}
After this, head back to the Alchemer Mobile dashboard and ensure you have activated your integration. From here, all inbound messages from Message Center should be routed to Zendesk. Messages typically show up in Zendesk within a minute or two of being received by Alchemer Mobile, but there may be a slight delay depending on server load.
If Your Target Becomes Unhooked
It is possible for your Zendesk trigger/hook to become deactivated. Luckily, this is easy to fix. To reactivate the trigger/hook, from your Zendesk Dashboard, go to:
Admin -> Admin Center -> Apps and Integrations -> Targets -> Activate your Apptentive target

